 Dad's Tech Lab
Automating Theengs Gateway with Github Action Runner
One thing that I’ve learned over the years is how valuable source control can be. Especially when learning something new, I wind up changing code or tweaking configurations until I get a better understanding how things work and to get things working how I want…but changes don’t always work out. Instead of undoing my changes manually, I love being able to just make commits and being able to roll back if needed, or even just comparing my changes.
Theengs Gateway is pretty cool so far from my experience, however I wish there was more documentation around all the configuration settings. Like I mentioned in my previous Theengs to Try Out - BLE Sensors, Theengs Gateway, and Home Assistant post, I flooded my Home Assistant instance with too many devices. I live in a neighborhood where houses are fairly close together, and I even picked up devices a few doors down and across the street. I knew immediately I had to stop it from getting worse and figure out how to whitelist devices, so that’s what I did. But I wanted a history of what I was doing. I knew then I needed to put the configuration in a repository, deploy the changes, and restart the service once I was done. That also meant I shouldn’t put sensitive information in my repo as well, such as user names and passwords. In this article, we’ll walk through:
- Installing Github Action Runner on the Raspberry Pi
- Creating a repo for your config without storing sensitive information
- Creating and using secrets for said sensitive information
- Creating a deployment pipeline using Github Actions
- Automating consuming configuration changes when pushed to your repository
Self-Host GitHub Actions on the Pi
In order to deploy the Theengs Gateway configuration file to my Raspberry Pi, I need access to my IoT VLAN inside of my network to. I also need to be able to restart the service. The easiest solution to me was to self host the action runner on the same Raspberry Pi. By doing this I can run any commands that I wish, and can even deploy to other devices on my network that it would have access.
Here’s the link to the official self-hosting docs from Github: Adding Self Hosted Runners
I’m not going into a step by step here, because Github does a great job giving step by steps in the link above, and it could change by the time you’re reading this. Github also gives you a specific token in the instructions on their site that you have to use. Here’s a quick breakdown of what to do for a Linux installation like I did on the Pi:
- Navigate to the
Settingsarea of your repository - In the left sidebar, expand the
Actionsmenu item and click onRunners. - Click on the
New self-hosted runnerbutton - Select your OS and architecture, for me with the Raspberry Pi 4 I selected
ARM64. - Make a directory from inside of your home folder for the action runner and navigate into it.
- Download the file, and validate the hash if you want.
- Extract the installer from the downloaded archive file.
- Create the runner and start the configuration experience with the token that Github gives you in their instructions.
- Finally, run the action runner!
Automate Deployments with GitHub Actions
Now to take advantage of what we’ve set up. We’re going to create a new repository to host the configuration file for Theengs Gateway. But we need to keep security in mind, take advantage of using Github secrets in a deployment pipeline, and clean up the configuration file.
Shhh - Pipeline Secrets
We need to remove the sensitive information from the configuration file we’re storing in the repository. Instead, we’ll store them as secrets that our deployment pipeline can use. We have a few options - either use a third party and integrate it with Github, or just use Github. I prefer the former as I can have a central place to manage all of my secrets and make them more reusable, but either way you will end up with secrets defined in Github that are available during the deployment pipeline. Let’s go ahead and define the secret variables names, and it will be up to you whether you want to define them in a third party like Infisical or in Github. I’d recommend defining them as repository secrets, unless you want to use them in other repositories after this.
HA_MQTT_HOST- This is the IP address of your MQTT brokerHA_MQTT_USERNAME- This is the username to authenticate with the MQTT brokerHA_MQTT_PASSWORD- This is the password to authenticate with the MQTT broker
Take the values from your configuration that match those descriptions and keep them handy. Next, we’ll add them as secrets to use later on. I won’t provide step-by-step documentation, but I do have docs linked for creating secrets in both Infisical and Github.
Infisical - Third Party Secrets Manager
I liked the idea of using a third party service to manage my secrets. This way, if I decide to use a different CI/CD service, I don’t have to move secrets. There is also one place to manage all of my sensitive information.
I won’t go into too much detail as it is an optional step in this process, but the service I decided to use was Infisical. I was easily able to sign up, add some secrets and integrate it with Github. You can even self-host it! However, I decided to use their free-tier service.

What Infisical does, at least with Github in my experience so far, is that once you set up a Github integration, is that it will sync the secrets entered in Infisical with those in Github. It manages them for you, so don’t change things inside of Github itself moving forward, only manage your secrets inside of Infisical. It even has versioning and point-in-time recovery. Pretty cool stuff.
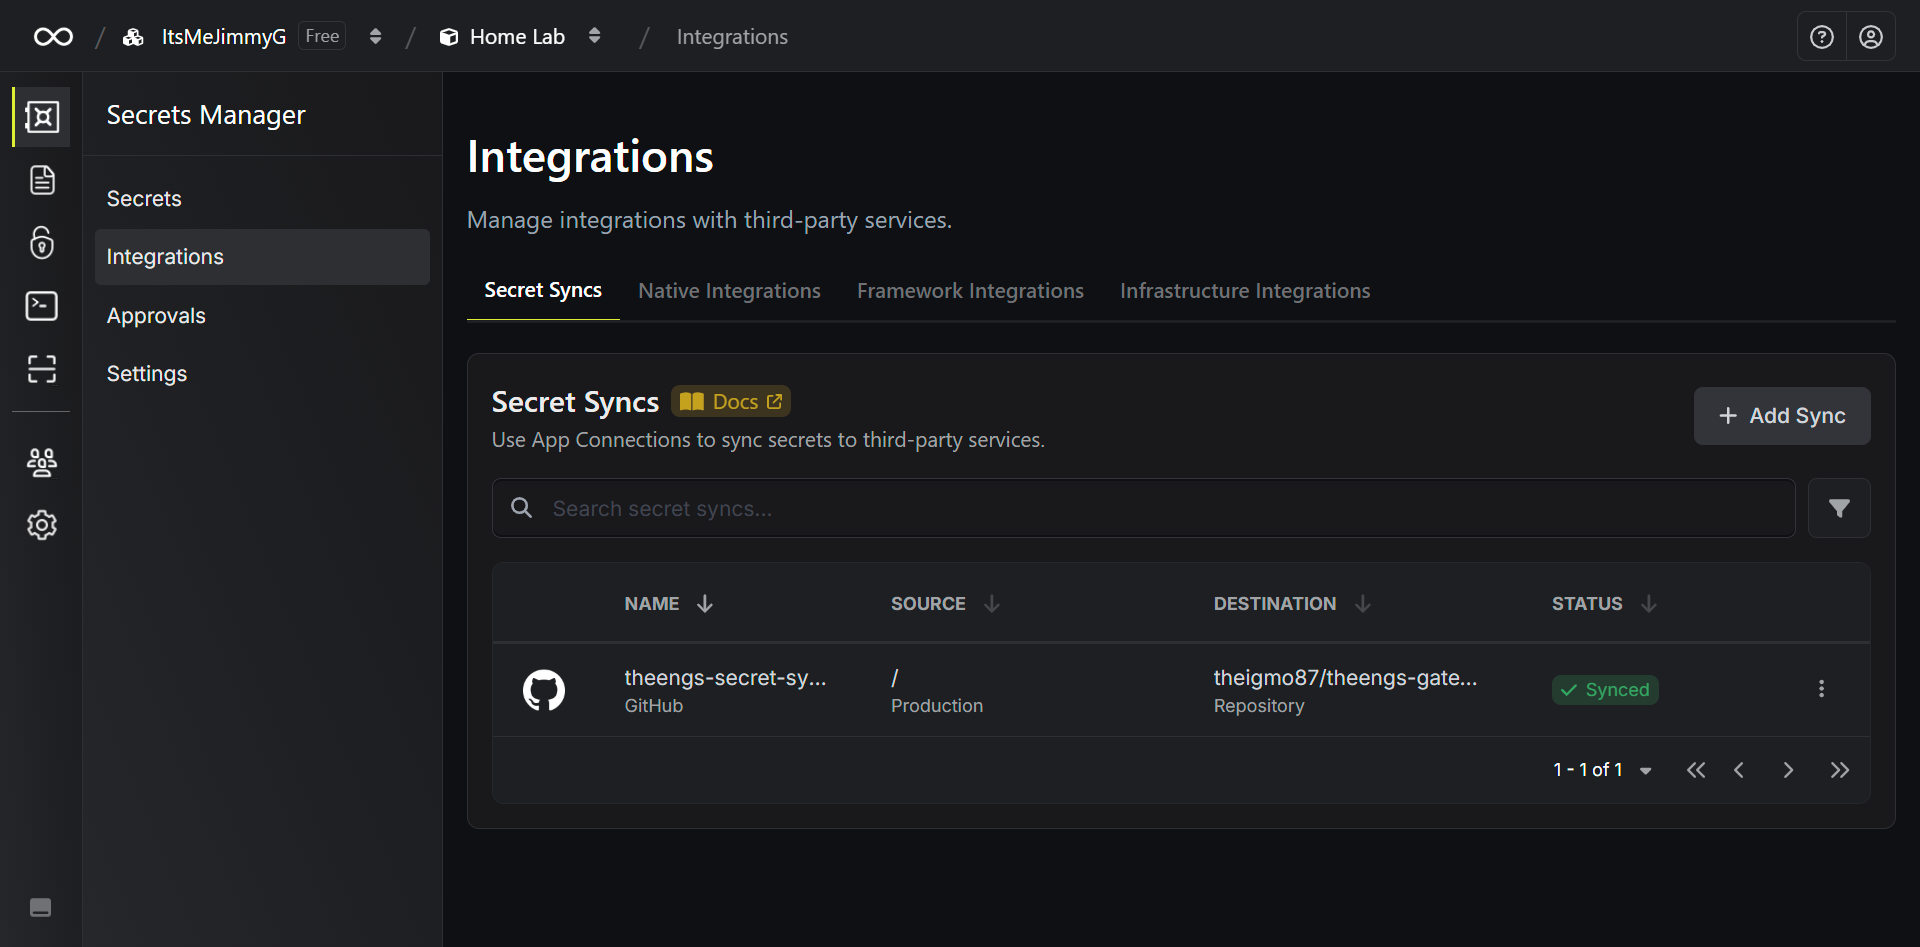
This makes managing secrets in one spot very handy, and you don’t have to change how you use those secrets with Github Actions.
Create your secrets in Infisical using their official documentation, using the names we defined earlier with the corresponding values from your Theengs Gateway configuration file. We’ll remove the value and replace them with placeholders soon.
Github Repository Secrets
Github has great documentation on how to set up secrets at different levels, including the repository level linked. My suggestion is to follow that documentation, adding the secrets we named earlier with the corresponding values from your Theengs Gateway configuration file. We will update the file with placeholder strings in a few steps.
Quick Comparison
| Option | Pros | Cons |
|---|---|---|
| Infisical | Centralized secrets, multi-repo support | Extra setup, potential cost, but the free version worked well for this |
| GitHub | Built-in, easy for single repo | GitHub-specific, less portable |
Creating Your Repository and Github Action for Deploying
Before we can create anything for deploying, we first have to create a repository for storing your configuration. Let’s create a directory, copy your configuration file into it, swap out the sensitive info with placeholders for secrets, and make our first commit. I’ll be doing this from my WSL installation since it doesn’t have to live on the Raspberry Pi itself, so your experience may slightly differ.
- I like creating an empty repository in Github first, cloning it locally, and then adding content for my first commit. Clone your empty repository locally after creating it. Here was the command that I ran:
git clone https://github.com/theigmo87/theengs-gateway.git- Open your repository in VS Code
cd theengs-gateway
code .- Copy your config file to your repository. I have SSH set up between my WSL installation and my Raspberry Pi, so it was simple enough to copy it via SCP. Update the following command by substituting out your user name, ip address, and location to the configuration file if it is different than mine. I also renamed the file so I knew it was a template. Run the command from the repository directory:
scp <user-on-remote-machine>@<remote-machine-ip>:/home/<user-on-remote-machine>/theengsgw.conf.template .- Remove your sensitive information. I removed my MQTT user, MQTT password, and MQTT ip address. Replace them with a placeholder that we’ll replace with the secret value in a script during our deployment. I went with the format
{{SECRET_NAME}}so that it was easy to remember and it wouldn’t clash with other regular string values. This was the resulting configuration file, omitting my whitelisted devices’ MAC addresses and thegateway_idbecause I used my MAC address for my Pi.
{
    "adapter": "",
    "bindkeys": {},
    "blacklist": [],
    "ble": 1,
    "ble_scan_time": 7,
    "ble_time_between_scans": 5,
    "ca_certs": null,
    "discovery": 1,
    "discovery_device_name": "TheengsGateway",
    "discovery_filter": [],
    "discovery_topic": "homeassistant",
    "enable_multi_gtw_sync": 1,
    "enable_tls": 0,
    "enable_websocket": 0,
    "gateway_id": "<gateway_id>",
    "general_presence": 0,
    "host": "{{HA_MQTT_HOST}}",
    "identities": {},
    "ignore_wblist": 0,
    "log_level": "INFO",
    "lwt_topic": "home/TheengsGateway/LWT",
    "pass": "{{HA_MQTT_PASSWORD}}",
    "port": 1883,
    "presence": 0,
    "presence_topic": "home/TheengsGateway/presence",
    "publish_advdata": 0,
    "publish_all": 1,
    "publish_topic": "home/TheengsGateway/BTtoMQTT",
    "scanning_mode": "active",
    "subscribe_topic": "home/+/BTtoMQTT/undecoded",
    "time_format": 0,
    "time_sync": [],
    "tls_insecure": 0,
    "tracker_timeout": 120,
    "trackersync_topic": "home/internal/trackersync",
    "user": "{{HA_MQTT_USERNAME}}",
    "whitelist": [
      "<device-bluetooth-MAC-address>"
    ]
}
You can see I used the placeholders {{HA_MQTT_USERNAME}}, {{HA_MQTT_PASSWORD}}, and {{HA_MQTT_HOST}}. Like I just mentioned, we’ll use these values for string replacements in our deployment script.
Make any other adjustments or remove any other values you want to manage externally, save the file, and commit and push the changes.
- Create a directory for your Github action by running the following command from the root of your repository:
mkdir .github && mkdir .github/workflows- Add the following file in the
.github/workflowsdirectory you just created:
name: Deploy Config and Restart

on:
  # Triggers the workflow on push or pull request events but only for the "master" branch
  push:
    branches: [ "master" ]

jobs:
  deploy-config:
    # Run on the self-hosted action runner installed on the Raspberry Pi running Theengs Gateway
    runs-on: self-hosted

    steps:
      - name: Checkout code
        uses: actions/checkout@v3

      # This step uses the secret placeholders and outputs a configuration file with the correct file name
      - name: Replace placeholders with secrets
        run: |
          sed -e "s|{{HA_MQTT_HOST}}|${{ secrets.HA_MQTT_HOST }}|g" \
              -e "s|{{HA_MQTT_PASSWORD}}|${{ secrets.HA_MQTT_PASSWORD }}|g" \
              -e "s|{{HA_MQTT_USERNAME}}|${{ secrets.HA_MQTT_USERNAME }}|g" \
              theengsgw.conf.template > theengsgw.conf

      - name: Move config to target directory
        run: |
          sudo mv theengsgw.conf /home/<your-username>/theengsgw.conf

      - name: Restart TheengsGateway service
        run: |
          sudo systemctl restart TheengsGateway.service
Now a step-by-step breakdown of what’s going on in our Action file:
- First we have the pipeline name.
- Second, we specify that we want this action to trigger on any changes pushed to the
masterbranch. - We then define the
deploy-configjob. - We specify it should run on the self-hosted action runner we have running on our Raspberry Pi that has Theengs Gateway installed.
- The first step of the job is to check out the code.
- We have a script that perform a string replacement, replacing the placeholders we inserted into the template file with secret values for our repository, and finally outputting the changes to a new file,
theengsgw.conf. This is the original file name that Theengs Gateway looks for in your the home directory ont he Raspberry pi. - Move the new configuration file with the secret values to the target directory.
- Finally, restart the service to consume the changes.
Commit BUT DON’T PUSH YOUR CHANGES! As soon as we push our change that includes the Github Action file, it will kick off our deployment pipeline. I want you to be ready to watch the logs and make sure things go as expected, or know where to look for issues. Now, let’s review and test it out!
Testing it out
Let’s take a look back to see what we’ve done and where we’re at. In the first article (
Theengs to Try Out - BLE Sensors, Theengs Gateway, and Home Assistant
), we installed Theengs Gateway as a service and had it publishing to an MQTT broker. So far in this guide, we installed a Github Action Runner on our Raspberry Pi that is also running Theengs Gateway and set it up as a background service. We then moved the Theengs Gateway configuration file theengsgw.conf into a git repository, first moving our sensitive values into a secrets manager before making our first commit and replacing those values with placeholders. Finally, we created the yml file needed for the Github Action so we could deploy our changes and restart the service.
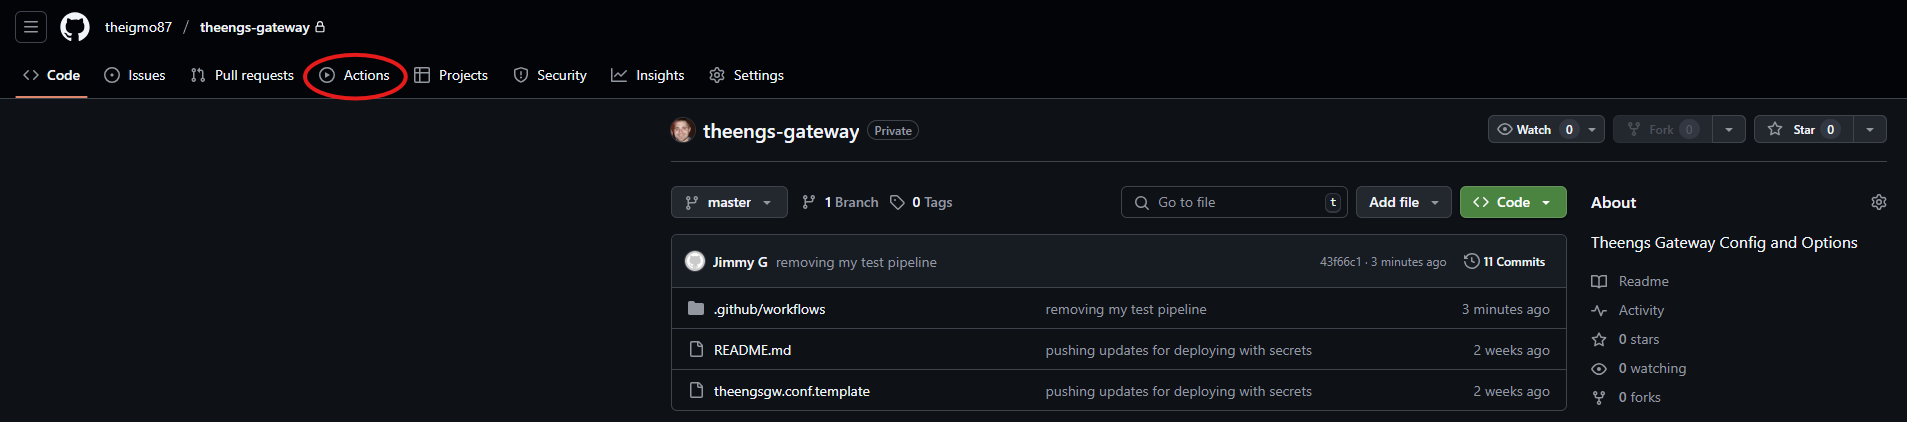
If you’ve been following this guide, you should be ready to push your deployment pipeline to Github. As soon as you push it to the master branch, it will kick off the Github Action we defined in our .github/workflows/deploy-config-changes.yml file. Before we push our final commit that include the yml file, navigate to your Actions area inside of your Github repository. I included a screenshot below for reference.
Once you are there, push your changes that include your yml Action definition, refresh the Actions page we just navigated to, and check out the logs. If you pushed directly to the master branch like you’re not supposed to (even though if you followed this you did it too like me, whoops 😆), it should kick off your deployment Action. Click on the workflow run and monitor it’s progress. If everything is set up correctly, it should walk through each step we defined, deploy the changes where they should go, and restart the Theengs Gateway service! Congrats, you just set up a CI/CD pipeline 🎉
If you run into any issues, check out the logs and work your way through them. You can always comment down below and I’ll see what I can do to help.
What’s Next
Now that we’ve set up our deployment pipeline, we can safely make changes and always revert back to what we had if things don’t work out. Feel free to play around with the configuration file, just make sure to keep any sensitive information out of the configuration file that’s checked in to the repository and in your secrets manager, especially if it is a public repo. And finally, make sure to work on best practices - don’t commit directly to master like we did here. Now that you have things set up you can create branches, perform pull requests, and once you complete the PR it will kick off the workflow run for you.
I think I may start digging into my home lab set up in my next few articles. I want to see what you think of my set up and how it can be improved. My wife and I will be building a house soon, and I’d love to learn from my mistakes and set myself up for success during the build process of the house rather than retrofitting things like I’ve done here. So I’d love to get some feedback and suggestions on things I can do better! I may also throw in a programming article. I’m itching to get back to working on an app I started a while ago, but it’s at a point where I want to do things differently on the mobile side and possibly rewrite the backend to another language so I can learn a few things.
If this guide helped you streamline your smart home setup, make sure to comment and share it with a friend! Until next time have fun with the new sensors you’ve set up!


